

FREEEEEDOMMMM!!!
Hello, Jason speaking.
OK Seriously. It’s pretty weird to be home without Liz around. She works from home, so she’s home in the morning when I leave for work and there when I get back. 99% of our extracurricular activities overlap so when she’s out of the house, I’m usually out of the house. Except for the book club evenings, I can count on her being home, which isn’t necessarily a bad thing.
On the rare occasion when I get the house to myself for more than one evening, you can count on three things: 1) The bed will not be made, 2) The kitchen becomes a war zone, and 3) I make all the pizza that I can handle.
It should come as no surprise to you, but I don’t like ordering pizza. I’m usually pretty disappointed with it, especially in Denver. Usually, you think “Pizza sounds great!,” but let me tell you that as somewhat of a pizza snob, the pizza that comes easily to your doorstep in 30 minutes or out of your oven in 20 minutes is pretty lackluster.
There are a couple of reasons why I like pizza. Most importantly, however, is that pizza’s foundation is made from gluten. Gluten is God’s gift to Man. I love all flavors of gluten and in every shape and size. I don’t care if it’s in bread form or beer form, pizza form or pasta form, and let’s not forget belgian waffle form. When gluten has a chance to flex its muscles, it can be incredible.
Before we get into how to make pizza, I’m going to tell you about some of my favorite things to eat. These include but are not limited to cheese, olives, pickles, and bread. Can you tell me what the common ingredient in all of them is [besides water]?
The answer of course is Time. It takes time to make cheese, to cure olives, to ferment pickles, and to make truly good bread. Usually, the more time it takes for something to develop, the more I like it. And of course, Time is the secret ingredient to good pizza at home. The more you can retard your dough development, the better your pizza [or bread] will be.

While I’m not an expert in the chemistry controlling gluten formation, I am somewhat of an expert at mixing water, flour, salt, and occasionally yeast to make dough. I’ve learned that the more time you have on your hands, the better your dough for pizza or bread can become. By slowing down the fermentation & gluten development, you will allow the dough to form stronger gluten bonds [or something] which ultimately trap gases, a tasty byproduct created by yeast, that try to escape during cooking. This strong dough handles the stress put out by the gases and traps them in the dough, resulting in a holey or bubbly crust that provides an incredibly satisfying “chew.”
Another benefit of slowing down the development is that you can make pizza with the black bubbly crust at home without a pizza oven that reaches temperatures up to 8,000° F [or whatever the fancy restaurants claim].
If you only have an hour and are jonesing for some homemade pizza, you’re going to end up with whelming pizza at home and that’s OK. The crust will be crust with tiny holes and taste like, well, crust. It’ll be better than most of the stuff you get in Denver, so there’s that. But if you have the time and patience to wait 24 to 120 hours [yes, that’s 5 days], you’re going to make pizza that blows your mind. I’m a firm believer that the crust make the pizza, and if you have patience, simple crust becomes Crust and pizza becomes Pizza.
When you want to start making your own pizza at home, you’ll probably follow something like this pattern: 1) You buy frozen/fresh prepared pizzas at the grocery store; 2) You buy Boboli crust, toppings, and sauce at the grocery store; 3) You search the internet for “one hour pizza dough” and repeat #2 sans Boboli; 4) You put Time into your dough and make your own sauce; and finally 5) You grow your own wheat, mill your own flour, milk your own cow, and make your own cheese.
Okay, probably not #5.
Before I lead you down the Jason Pizza Road, I will warn you that if you are looking for a thick crusted, heavily sauced, ultra greasy pizza, turn away. The pizza that I like is light on sauce [in fact I more frequently lean on olive oil], thin crusted, and easy on toppings. Of course, you can probably use this dough recipe and stretch it as thick as you want, throw it in oil lined cast iron, and toss it in the oven at 400 for 40 minutes, but you’re on your own there as I just made those numbers up.
This recipe is broken into two parts: dough formation and cooking. Dough formation applies for the two cooking methods.
Dough Formation
This dough can be used to make both pizza dough and 2 crusty loaves of bread.
Ingredients
- 1kg flour
- 900g White Flour (Tipo 00 > All Purpose/Bread, but I usually just use AP)
- 100g Whole Wheat (“Healthy” and optional, replace with whatever you’re using above)
- 20g salt
- 650g water
- 7g active dry (NOT instant) yeast (1 tsp ish). Red Star > Fleischman’s.
Instructions
- Plan when you want to eat your pizza. This will be either 24 hours after you start the dough, or 72, 96, or 120 hours after you start.
- Mix everything together with your hands in a bowl. It is very important to do this in the bowl that had your sourdough bread dough from earlier that morning so you only have to wash that bowl once. As you become a Dough Master, it is important to feel how the dough is coming along, especially if you don’t have a scale and have searched for weight to volume conversions on the internet and don’t know if your water:flour ratio is right [don’t worry, you’ll be fine]. Also, it is very important to remove your wedding ring so the dough doesn’t claim it hostage. It’s more important to put the ring back on after you are done making dough.
- Walk away for 20 minutes. This is very important. Go drink a beer or something. This allows the flour and water to mix together properly so you can actually knead it.
- Knead the dough in the bowl. Do this with your hands [knuckles work]. This allows you to feel the resistance of the dough as you knead it. If you are doing this with your hands, if the dough still sticks to your hands you have not let it rest enough. See the photos for visual reference.

Sticky hands mixing dough ingredients 
Not sticky hands kneading well rested dough If this if your first time kneading dough, this is how it goes. You start working the dough over itself with one fist until the arm wears out, then you switch and wear out the second arm, and then you swap back to the first arm until you can absolutely handle no more. This should take you about 10-15 minutes. If you’re lucky enough to have a stand mixer, you can do this for 10 minutes or so on high, I guess.


5a) If you are planning on eating pizza 24 hours later, cover the dough with plastic wrap and set it on the counter to rise. This makes “Good Dough.”
5b) If you are eating pizza 3-5 days later, cover the dough with plastic wrap and toss it in the fridge. This makes “Great Dough.”
End Dough.
Cooking Methods
If you opted for the refrigerator dough [which you should have], take it out of the fridge 2-3 hours before you’re ready to cook it. It’ll grow in volume by 50-100%.
At this point, decide if you want Good pizza or Great pizza*. This dictates your cooking method. Good pizza is made on cookie sheets and Great pizza is made on blazing hot cast iron. This recipe probably makes 2.5 large cookie sheets worth of pizza or 6-8 skillet sized pizzas. I told you I like pizza.
*Good Dough can make Great Pizza, but Great Dough makes Greater Pizza.
Good Pizza
You will need:
- Dough, Good or Great
- Toppings, all cooked and chopped. I had an onion and some sausages.
- Sauce, preferably homemade [cook a can of tomatoes, salt, pepper, whatever herbs you have, and a some wine in a pot for an hour]. I used a can of tomatoes because I forgot to cook my sauce, whoops.
- Low moisture mozzarella cheese
- Corn Meal, for dusting
Instructions
- Split the dough into 2-3 pieces and form into balls.
- Preheat the oven to 550 or as hot as it will go.
- When the oven is preheated [20-30 minutes later], stretch your dough out to the size of your cookie sheets. You can do this with a roller on the counter, but this forces the gas out of the dough and won’t make as good of a crust.
- Throw some corn meal onto the cookie sheet and put the dough on the cookie sheet.
- Put the sauce on the dough with toppings, in whichever order you prefer. Don’t be hamfisted with the sauce or the toppings or else the top of your dough will be undercooked with these cooktimes.
- Place the pizza-containing cookie sheet in the oven on the middle rack and prep the second pizza.
- 12-17 minutes later, when the crust looks done pull the first pizza out and toss the second one in. Don’t put both in at once unless they can go side by side with 2-3 inches between the pans and between the pans and the walls of the oven.
- Put the cooked pizza on cooling rack so it doesn’t get sweaty on the bottom.
- Repeat #6 until no uncooked pizza remains.
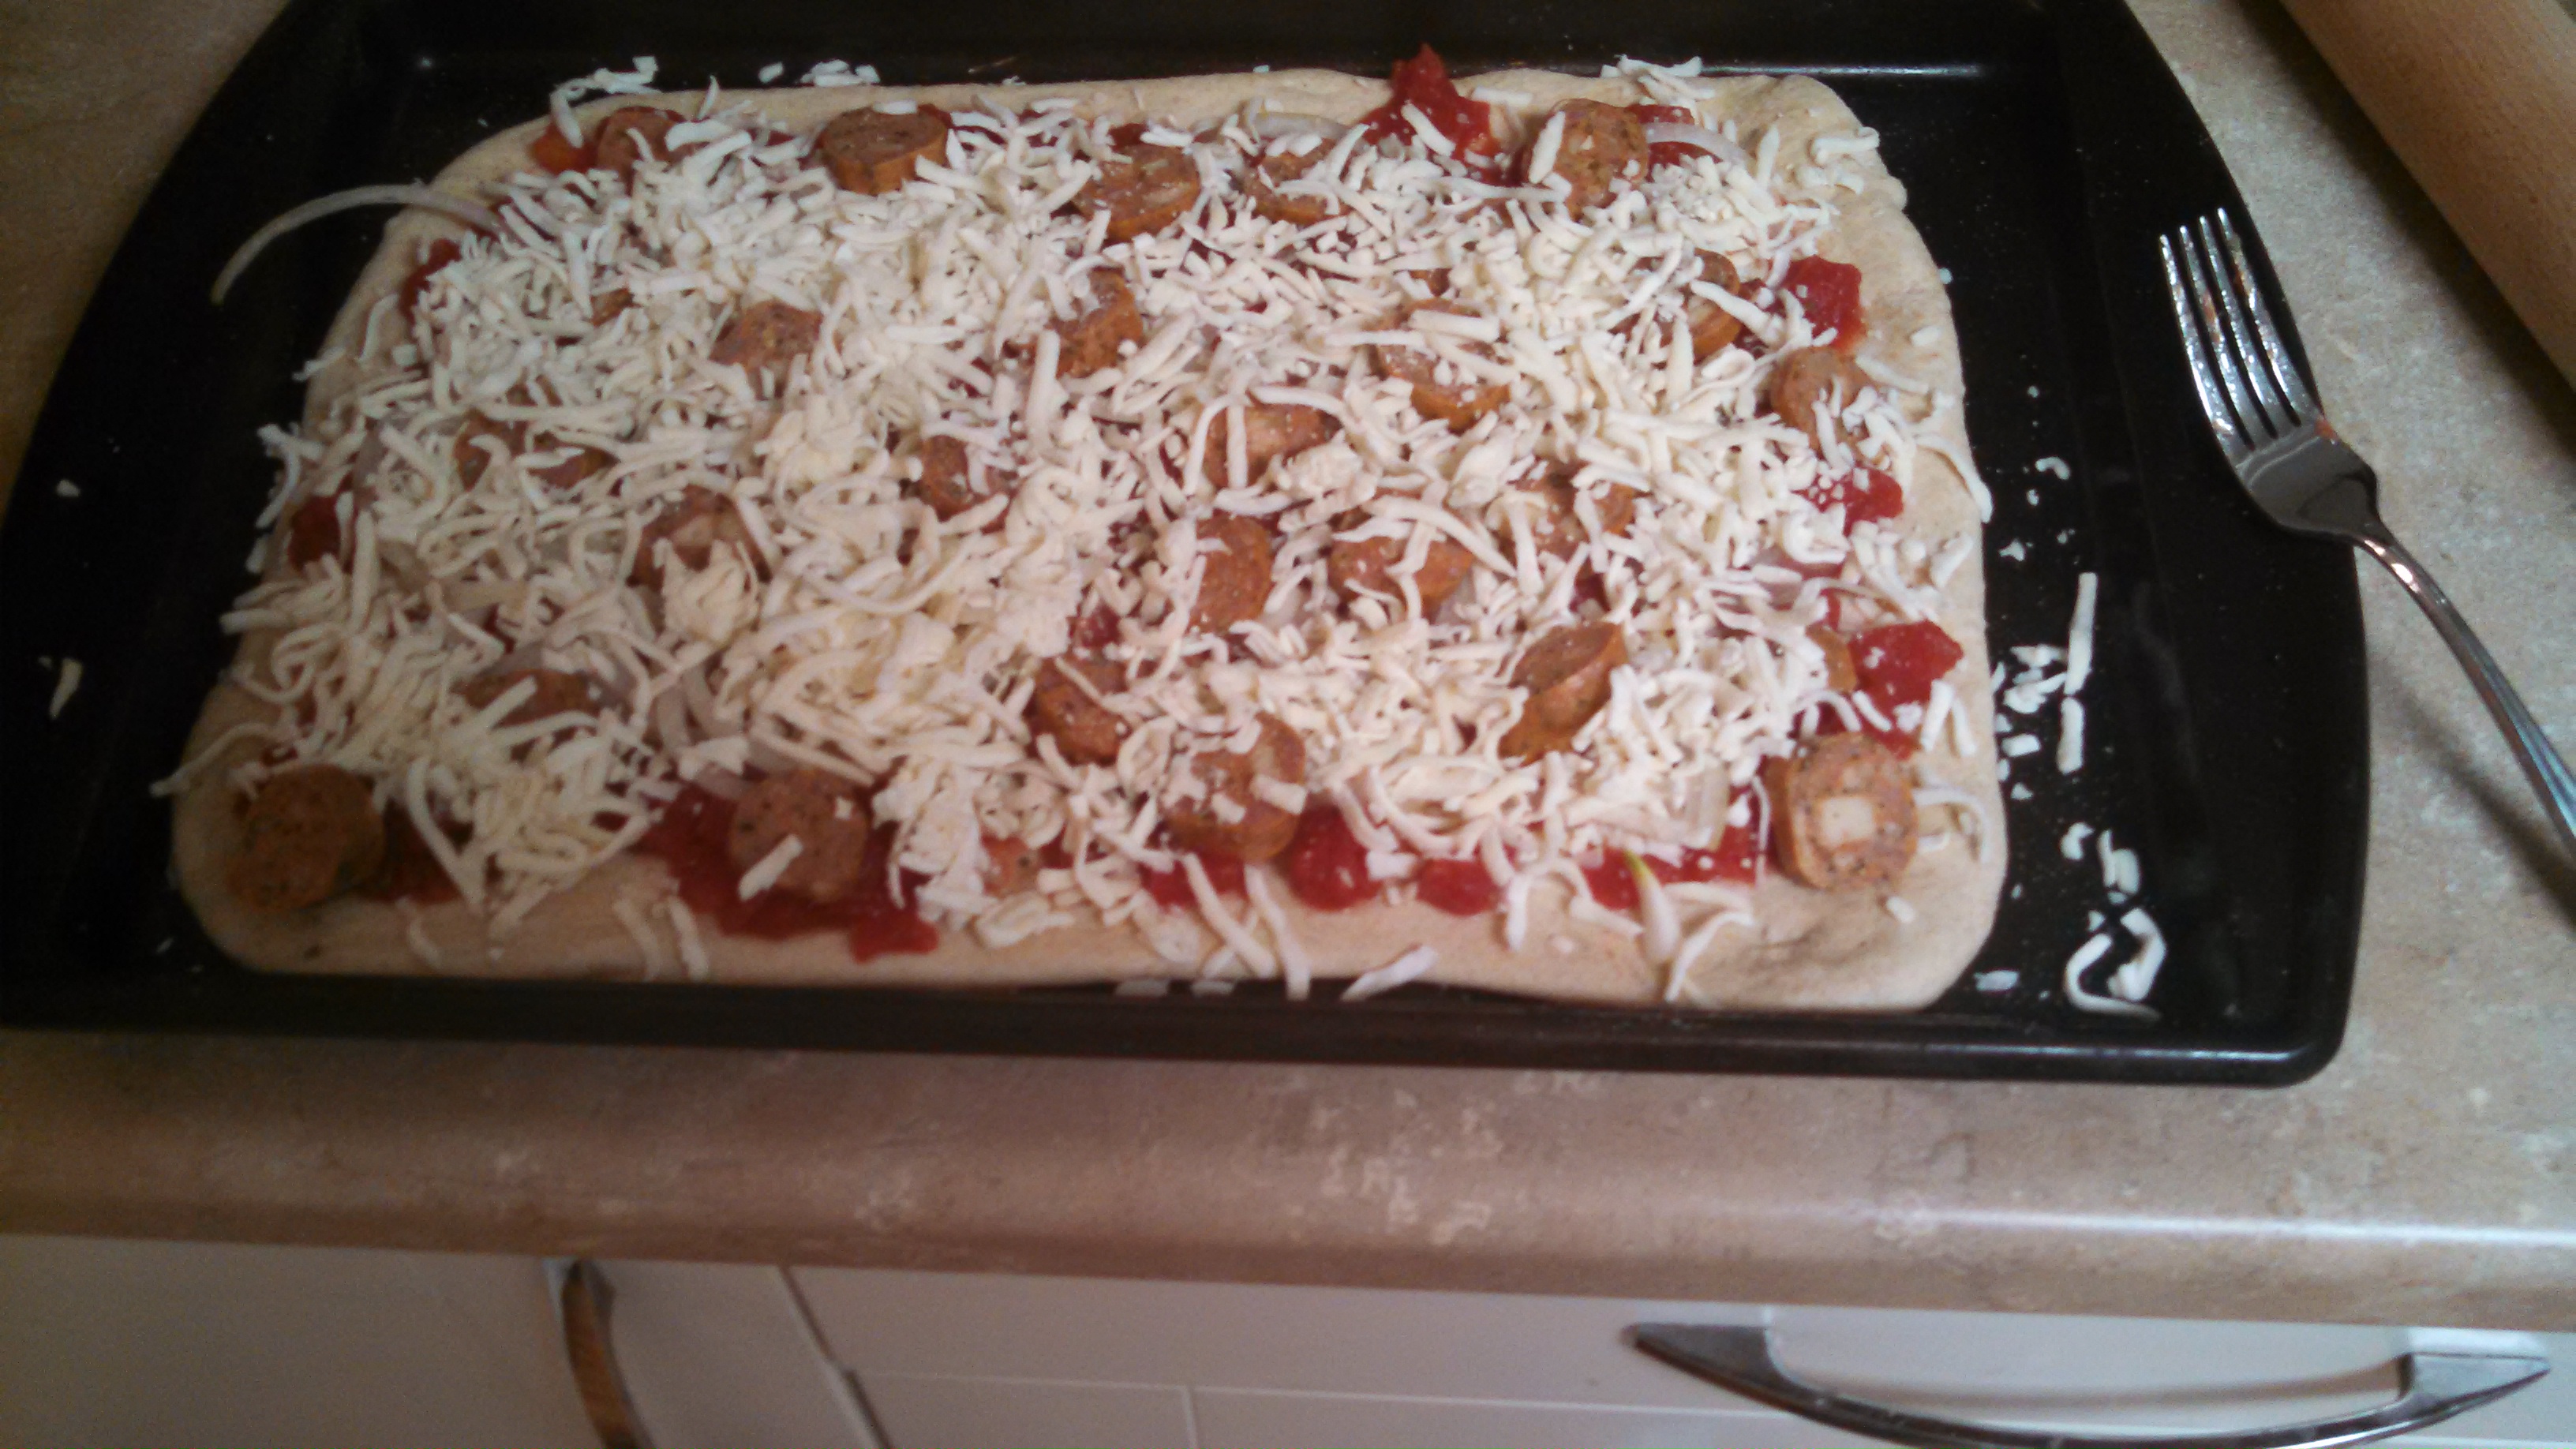
Have a photo of uncooked Good pizza. I forgot to take a photo of the finished product. Sorry. Fork Optional [I think I used it to spread the tomatoes around?].
Great Pizza
I applaud you for opting for Great Pizza. Making Greater pizza can be stressful, is somewhat dangerous, can cause fires, result in overly burnt pizza, fill your kitchen with smoke, and is thus not for the faint of heart.
For this exercise you will need cast iron skillets and a broiler-enabled oven. Cast iron is much more important than the broiler, though the broiler will provide the blackened bubbles offered by the “artisan” or “rustic” or “fancy” pizza makers.
Start to finish great pizza is done in 5-6 minutes per pizza. It’s a rapid fire approach and you may start sweating. Aim for more personal sized pizzas here for optimal cooking.
You will need:
- 1-2 Cast iron skillets
- Hot pads
- Dough, Good or Great
- Toppings, all cooked and chopped. I think I just used onion and maybe whatever sausage was left.
- Sauce, preferably homemade [cook a can of tomatoes, salt, pepper, whatever herbs you have, and a some wine in a pot for an hour]. On this pizza I used olive oil.
- Low moisture mozzarella cheese
- Parmesan, and lots of it if using olive oil.
Instructions
- Take your dough and split it into 6-8 pieces that can be stretched to the size of the cast iron that you will be cooking on.
- Preheat the oven to 550 or as hot as it will go. Put the top rack right underneath the broiler.
- Open a window and turn on the vent.
- Prep all your toppings, cheese, and sauces. This means take the lids off, have serving utensils for sauce, put them next to the oven, etc because when it comes time to put them on the pizza, it will be a fire drill.
- When the oven is preheated, put the cast iron on the stovetop and crank the burner to high. You want it to get smoking hot.
- Turn the oven to HIGH BROIL.
- When the cast iron is smoking hot, stretch your dough into roughly the shape and size of your skillet. I like to leave a little extra thickness on the ends for extra big crust, but evenness is good too.
- Prepare yourself.
- Put the dough on the skillet and immediately begin putting the sauces and toppings on it. You want to get this bad boy under the broiler ASAP. This should take you no more than a minute.
- Using a hot pad, put the cast iron in the oven on the top rack and cook for 3-5 minutes.
- If you have a second cast iron, stretch and dress the second pizza after about a minute after putting the first pizza in.
- Open the oven and put in the second pizza. Do this as quickly as possible to keep heat in. Take a quick peek to see how your first pizza is doing and pull it out if it’s getting dark brown on the crust and the cheese is getting glowy orange and bubbly. If not, close the oven door and wait another minute.
- Pull the first pizza out quickly and get it off the skillet ASAP. Put the skillet back on the stovetop and crank that bad boy up to high in anticipation for the 3rd pizza.
- Pull the second pizza out and get it off the skillet ASAP. Again, put the skillet back on the stovetop and turn it to high.
- Calmly regain yourself and prepare yourself for round two.
After they’re out, crack some fresh black pepper and sprinkle some salt on these bad boys before going to town. Also, wait for the cheese to cool [slightly] if you can.
I’ve found that I can do four pizzas like before I need to re-preheat the oven to 550. After pizzas number 3 & 4 come out, you don’t have to heat the cast iron on high. Turn the oven back up to 550, take 5-10 minutes, and then come back to finish off cooking your pizzas.
A personal note on favorite pizza topping combinations. My favorite pizzas use either pesto or olive oil as the sauce base and have some combination of thinly sliced onions and garlic, pine nut, and chicken. The cheese that I like on these “green” pizzas is a hefty amount of fresh grated parmesan. Tomato & fresh basil on olive oil make a close second. For hearty pizzas, I like red sauce, sausage, mushrooms, and onion.
Here is a photo of a Great pizza cooked on cast iron. You’ll note that it lacks the black bubbles as promised. That’s because I learned right after cooking that pizza that our oven’s broiler actually broils in the drawer beneath the ove and not at the top of the oven like every other oven I’ve dealt with. I should stop saying “our oven’s broiler sucks” and just start actually properly using our broiler as designed. No wonder the cookie sheets down there always got so hot?

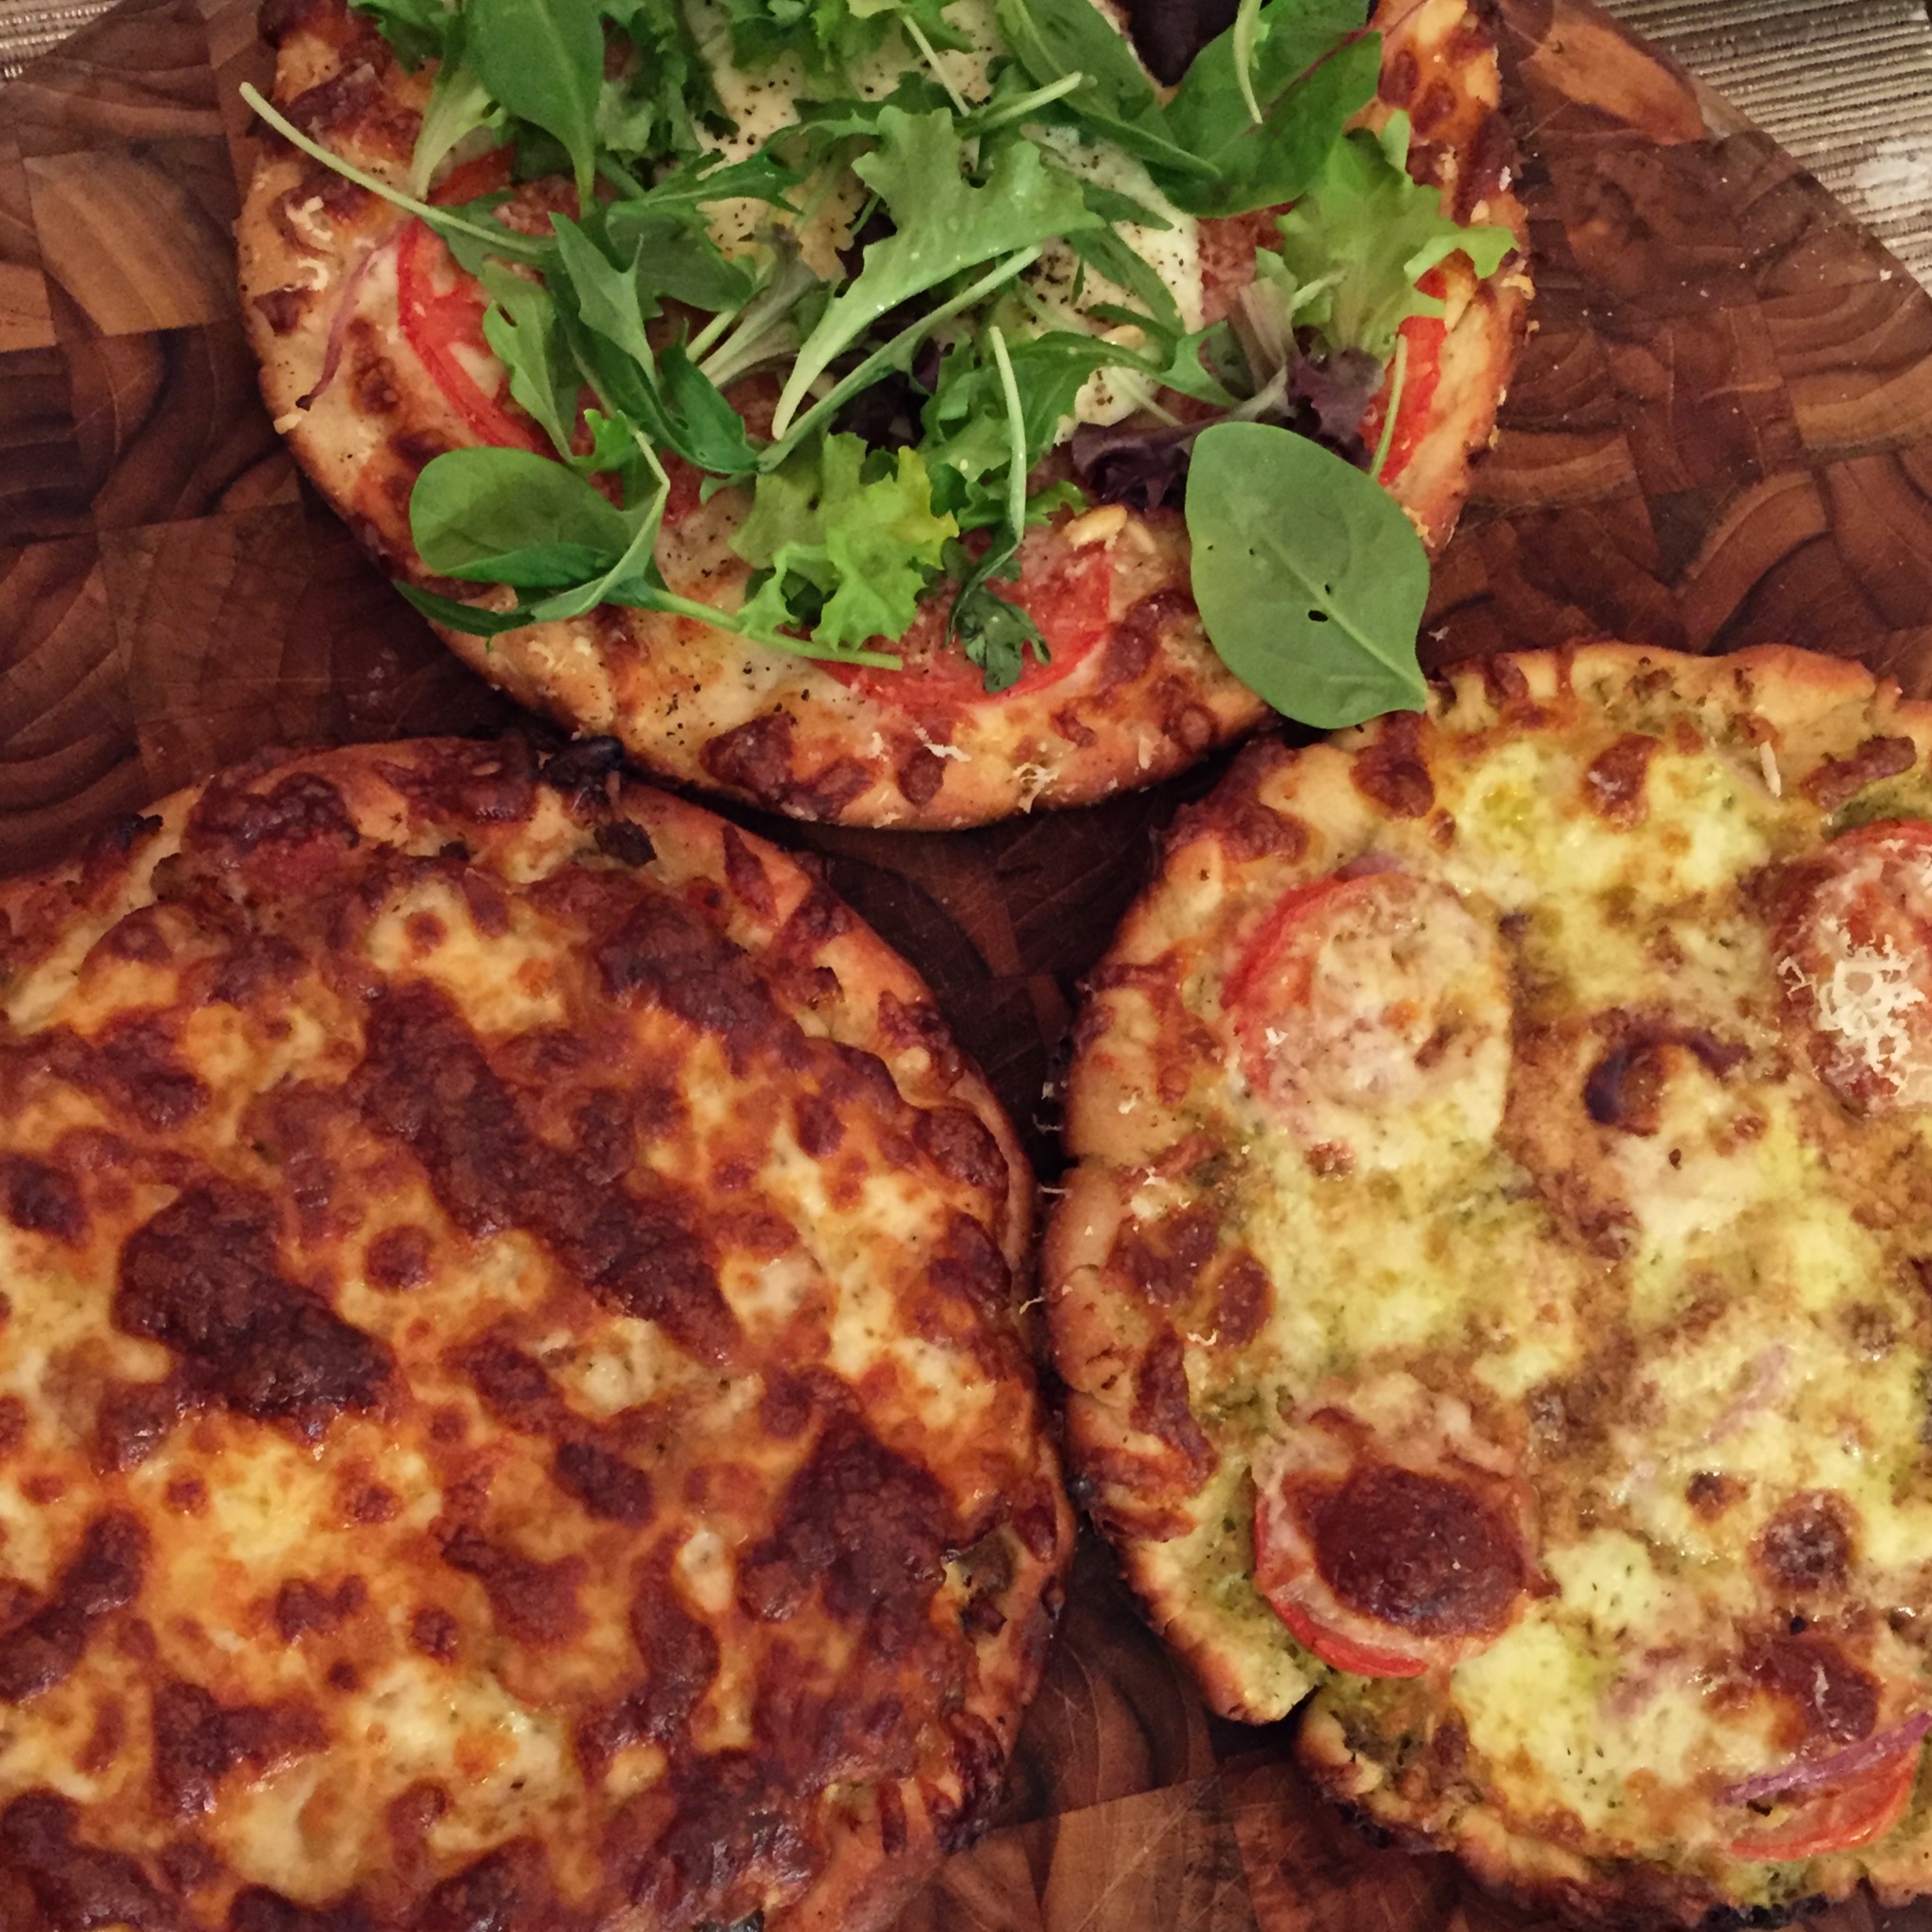 On the rating scale, without the broiler this pizza ended up being a “pretty good,” which was higher than good but less than great. You can see that the hot oven still helped a fair amount of bubbles form on the crust, but I just didn’t get the browning and blistering that the broiler can provide.
Enjoy!


Leave a comment